verse of the day

Showing posts with label frame. Show all posts

Saturday, February 11, 2012

windows of opportunity

old windows
hey friends
there's been an obvious absence from my blog. 
blogging has taken a back seat.
life has been incredibly busy, bordering on chaotic, but also very blessed. 
the theme of "old windows" on funky junk interiors saturday nite special
was just the kick in the pants catalyst i needed
i happen to LOVE old windows,
in fact so much so that i have a stash of them in all shapes and sizes.

 so without further installing...here's what i have done with some of those windows.
the porch pic above is a window original to our home, i believe from the chicken coop
the glass is long gone but the shabby, rustic vibe is just loverly.
see what's behind window # 2 here
in it's former life it was hiding in the cellar 
a sneak peak interior view
added some architectural element in a corner
love that tall narrow window
another cellar window used as an entryway photo frame
these are professional prints from new england that have been
in my stash for years...and they now have a happy home
the chicken coop window has come in from the cold
and is now hanging around in the livingroom

and now the opportunity...
another reason for my busyness.

i was contacted by a local interior designer who found me
on junkmarketstyle.com
we chatted a bit before the holidays via email and finally
met face to face a few weeks ago
that first meeting lasted six hours
yes, six hours!
we had so many common interests
and she wanted to share with me her vision for
designing a house that will be in the parade of homes this fall.
and
to ask if i'd be willing to help with the design aspects of the home

so my dear readers, that is 
my window of opportunity
i am so excited to work with taylor and assist her in choosing
the decor for this house.  i didn't realize how much detail and design
work goes into one of these homes, but no matter, it's going to be
an opportunity of a lifetime and i'm ready for the challenge.


until next time...
"interior designer in training"

linking up and joining the parties at:


Beyond The Picket Fence


Saturday, August 6, 2011

chalkboards anyone?!

i decided to make a culmination of posts and one dedicated specifically to chalkboards.  they are the rage as you know and there are SO many items and surfaces that work incredibly well with chalkboard paint.  so without further ado, here are my chalkboard paint projects. 
this one was used at this wedding and again at our son's a few weekends ago
(pics coming soon!).
it now hangs in our kitchen after i stenciled MENU on it
for the last wedding.
you will find the tutorial for the next chalkboard here
this was a gift for my bff and so fun to embellish with
a little bit of this and a little bit of that.
the side of our vintage kitchen cabinet is covered in chalkboard paint
where i like to add quotes, scripture and birthday/holiday messages
like this
and this
( btw deck door is now painted black)
and last is a vintage 1950's heywood wakefield schooldesk
with a chalkboard painted writing surface.
(currently for sale and can be personalized)
 
thanks for stopping by!
linking up to funky junk interiors SNS #93

Sunday, August 29, 2010

a little bit of this & a little bit of that


i recently finished a project which was a gift for a dear friend for her birthday (a monumental one at that).  the original picture was purchased for $1 at a yard sale a few months ago.  it was a 1/2-inch thick wood laminated etched picture.  it was in sad shape but the size of the frame was perfect for what i had in mind.

before:
it took a. lot. of. work. due to the learning curve i was on.  the decision to remove the laminate from the back was NOT a good idea but what's one to do when you're already knee deep into the project...well, you just. keep. going. and HOPE that your mistake will develop into something better!  
i first removed the frame from the wood picture before beginning on the torturous laminate removal.  with some much needed help from mr.1829 and his trusty side-kick "blowtorch", the last bits of laminate were removed in no time.  
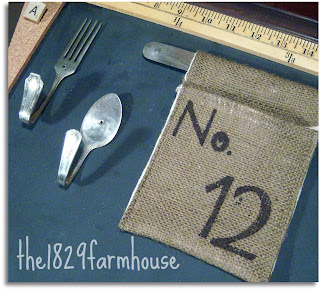
then once sanded, wood puttied (due to the laminate not wanting to let go of the wood AND being a bit too aggressive with the scraper) and chalkboard painted, it was well on its waywith the addition of a little bit of this and a little bit of that from my stash of "junk", it is now a message center for her kitchen.   some of the inspiration for the elements was found via an online google of chalkboards (silverware hooks) and pottery barn (the burlap pocket) i added the stenciled corkboards, modge podged clothespins, and scrabble tile pushpins for some funky detail as well as the yardstick border.


it was such a fun project from inspiration to design to completion...especially since it was for someone near and dear to me..."my 12th".  

you may be wondering about that number 12.  It began oh so many years ago when i came across this writing by terri camp, which i had emailed to my bff.  here is an excerpt below that explains it all.

my twelfth best friend by terri camp
...i'm guessing at this moment you are pondering how someone could actually want to claim the title of another person's twelfth best friend.  is it because i am so popular that she has gotten in line with all the others who claim "best friend" status?  is it that she is just so happy to have me for a friend she is willing to allow herself to be considered my twelfth best friend?  no.  the fact is, she had to get in line behind my family. in the best friend line, first comes Jesus, then Steve, then my eight children, followed by my dear sister, which leaves my next best friend in number twelve status.  you know, Jesus had twelve best friends, so i guess it's okay if i do too...

my bff has 9 members in her family, thus the number nine after their nameshe has a wall on the side of her pantry that i sneakily had one of her children measure to be sure it would work...it was a perfect fit!  i love it when that happens.  with the addition of heavy duty picture hangers, wall anchors and a set of chalk ink, it was finished.   
if you have any questions regarding any of the "how-to's" for this project, just shoot me an email, i'd be happy to help.


project supplies:
gorilla wood glue
gorilla super glue
modge podge
craft paint (for stencils)
5-inch stencils
scrabble tiles
thumbtacks
yardstick - cut to fit
corkboard tiles
chalkboard paint
chalk (for prepping surface)
burlap
vintage silverware: knife, fork, spoon
mini clothespins
old hymnal pages- cut to fit clothespins
chalkboard eraser 
chalk ink markers
picture hangers & wall anchors


linking up to Funky Junk Interiors SNS#45 & #69

 The CSI Project  and Transformation Thursday


Funky Junk's Saturday Nite Special    

Wednesday, January 13, 2010

Musical Revamp

A Christmas gift for my bff and her family included this little ditty.  I found it in the markdown aisle at my local HomeGoods store and could see its potential.  A bit of my favorite black paint, kraft paper, Modge podge,  sheet music of 2 of her fav songs and Gorilla wood glue (great stuff!).  


Before:


  • Take the frame apart carefully (as seen in above photo)
  • Paint the frame and letter in desired color (I chose Pittsburg Paint black satin)
  • Brush Modge Podge on frame backing
  • Crumple piece of kraft paper and placed in bucket of water-then squeeze out excess water
  • Carefully uncrumple paper, spread out on frame backing and apply another coat of Modge Podge.
  • Take emphemera (sheet music in this case) crumple and follow same steps as kraft paper
  • Place music as desired overtop kraft paper on frame back - apply another coat of Modge Podge
  • Glue letter on top of sheet music and frame together
  • Add desired ribbon (I chose 2 -black grosgrain and burlap) stapled to back. 
After:


Thank you to my 12th's hubby for taking the AFTER pics
(cuz I forgot in the craziness of the holidays!)


LinkWithin

Related Posts with Thumbnails
Blogging tips